
What do you do with your extra fabric swatches and scrap pieces?
I discovered one great way to use them - create a jotter journal! What are jotter journals, you ask? They are little notebooks, quickly made, that you can drop into your purse or work bag to jot down notes, grocery lists, to-do items, etc.
Being a list-maker
myself and accumulating quite a stack of Spoonflower swatches from
recent proofs, I decided this was the perfect way to use some of them up
to create fun, unique little jotters.
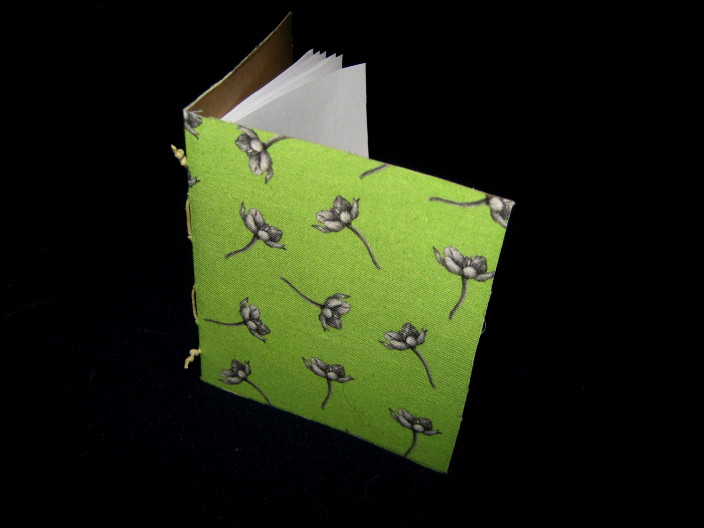
I first came across this idea at The Creative Place, an art and craft blog by Ashley Connelly. She recently posted a wonderful tutorial on creating these so I finally gave it a try. Here is the final result!
Ashley's tutorial gives all of the step-by-step details, but I modified my project a bit according to what supplies I had on hand as well as the fact that my machine sewing skills leave a bit to be desired. My supplies included:
- Kraft cardstock - cut to approximately 6" long by 3.5" wide
- Plain white computer paper - 8 sheets cut to approximately 6" long by 3" wide
- Fabric swatch - I used a swatch of quilting weight cotton in my Orange Star blossom print. Because of the small journal, I have just enough of the swatch leftover for another jotter of this size.
- Glue stick - craft size...it's a little wider than your average glue stick. Ashley used spray adhesive.
- Waxed bookbinder's thread - about a 5-6 inches. This is for sewing the pages to the cardstock. It is what I have on hand, though you could use embroidery thread, yarn, or other decorative cord. Ashley sewed her pages in on her sewing machine.
- Heavy needle with a big eye - mine is a bookbinder's needle that I had from a kit I bought one time.
- Two bulldog clips, or other binder clips
- Scissors
- Credit card for smoothing the fabric.
I won't go into each step here, but I followed Ashley's tutorial, substituting my supplies as needed.
RESULTS and TIPS:
I found that the glue stick seemed to work just fine for adhering the fabric to the cardstock. Definitely make sure you get glue all the way to the edge of the cardstock and make it an even layer (no clumps of glue or it will bleed through the fabric.) One problem I seem to still have is a bit of thread here and there peeling away from the very edge. I'm not sure what the best fix is for that aside from folding the fabric over and gluing the edge to the inside of the jotter. But then you need to create end papers to cover the exposed fabric edge and it becomes a more involved project. Perhaps it is not a huge deal for an informal jotter like this?
The other big difference in my project was that instead of using a sewing machine to sew the pages to the cardstock, I simply cut a length of my waxed bookbinding thread, poked 6 holes, evenly spaced, in the pages and cardstock, and hand-sewed the pages in.

I put two small knots on the outer threads to hold it in
place. You could get fancy and leave a longer tail on the bottom and add
a decorative bead to it if you wanted. Or, you could also sew in a
little closure that wraps around the journal horizontally. The
bookbinding possibilities are endless! :) But for this simple on-the-go
jotter, I thought a few well-placed stitches in the center would do just
fine.

I am looking forward to creating more of these little gems with other fabric that I have. I might even get crazy and put some of my good drawing paper and create an on-the-go sketch journal! Lots of great ideas brewing. Let me know if you give this project a try - I'd love to see your results!
2 comments:
What a nice little book to use your fabrics on! I'm thinking that perhaps it wouldn't be too much more trouble if the fabric was wrapped to the inside of the cover (just a little bit) and a sheet of plain paper glued in to cover the raw edges of the fabric. It would make a really professional looking finish. But then--depends on what you are going for. Just the way they are, they are neat little utility booklets. I might just try one myself. :-) -Anita.
Thanks, Anita! Yes, the librarian in me is cringing that I didn't wrap it around :) It probably wouldn't take much more effort to finish it off with some simple end papers. I just wonder if the glue stick would be sticky enough to hold it down? Must experiment! :) Definitely let me know if you try one out!
Carol
Post a Comment