Showing posts with label botanical illustration. Show all posts

Sunday, July 19, 2015

Sketchbook Exchange - Drawings #6 and #7 and my own book back!

It has been a busy time! I last posted in March and we are now to mid-July! In those four months, I  have completed the final two drawings for the sketchbook exchange project that I have been a part of for the past year.

I also moved houses and went on vacation, so I was thrilled, upon my return, to find my own sketchbook back from its last stop in Singapore, filled with amazing artwork from around the world!

Here is a peek at some pictures of the gorgeous pieces that fill my sketchbook from seven amazing artists. From left to right (starting in the top left corner): Linda Trella, Giulia Canevari, Elaine Moore Mackey, Beryl Prout (two pages), Mischa (two pages), Sevil Medhi, and Teo Nam Siang.


Previous to getting my own book back, I finished up drawings for Giulia's and Linda's books.

For Guilia's, I did some ink and colored pencil drawings of the beautiful chive blossoms that were popping up in my old garden. I also found some neat seed hyacinth seed pods to round out the other page (graphite, ink and ink/colored pencil.) I was anxious to get this mailed out before our move and was glad to get it finished.


Linda's book was carefully packed in my bag so I wouldn't lose it. Once we were settled in a bit at the new place, I was able to do some drawings of iris buds that I had from my old garden and then found the perfect finishing touch at the new place once my hostas started blooming. I used ink and colored pencil on the hostas, colored pencil alone on the one iris bud and graphite alone on the other iris bud. Happily, I was able to mail this out to Linda before vacation.


A modified group of us (depending on availability, etc.) plan to continue the exchange for a second round starting in August, so stay tuned!

Sunday, March 29, 2015

Sketchbook Exchange Update - Drawing #6!

Over the holidays, I saw a beautiful helleborus plant and decided to bring it home. Despite being called the Christmas Rose or Lenten Rose, hellebores are not closely related to the rose family. Instead, they are an evergreen perennial flowering plant in the family Ranunculaceae.

This particular plant had beautiful, creamy white blossoms with a tight cluster of stamens in the center that open up as the bud flowers. With thick stems that have a red/brown markings and large, serrated leaves, they make a striking addition to the table. I thought it would make a great subject for my next sketchbook entry.

I started with some rough graphite sketches to get a sense of the shapes of both open petals and buds. I did a little bit of sketching of the leaves as well. The biggest challenge, though, was the center of each blossom with up to 150 stamen surrounding the pistil.

I took many reference photos, especially close-ups of the open blossoms. This proved fortuitous as I inadvertently over-watered my beautiful plant and it did not survive! So, between my sketches and photos, I was able to create this sketchbook entry:


I still love the combination of ink and colored pencil, so I went over my initial pencil sketches with a 3x0 (.25) technical pen, adding some details here and there. Then I also used my Faber-Castell Polychromos colored pencils to add color to the page on the left. I think the page turned out well.

I am currently looking for a subject for the sketchbook that I have on my desk. Wish me luck!

Friday, June 1, 2012

My First Exhibit!

I am very excited to announce my participation in this wonderful exhibit on scientific illustration that opens tomorrow, June 2, at the Ann Arbor District Library downtown.

The exhibit, "Illustrating Science: From Anatomy to Zoology", showcases scientific illustrations on a range of subjects, done by local illustrators. Four of my botanical illustrations are on display.  It runs for a month and a half and includes not only finished artwork, but also field studies and sketches. If you are local, be sure and stop by the downtown branch of the Ann Arbor District Library!


Wednesday, March 7, 2012

Trillium - Done!

Here is a scan (not just a photo as I had posted before) of the final version of the trillium in ink and colored pencil:


I continued to work on the shading and dark areas with dark indigo, but most of what I did was "paint" with my kneaded eraser by lifting out areas of color where there are highlights and then doing a tiny bit of blending after that.

Here is a detail shot of the center (per Irene's request!) :) I am embarrassed at how much clean-up I need to do around the edges!! However, it is helpful indeed to see a close-up.


I really like how it turned out. Is it perfect? No, but it feels "done" to me. I don't want to compare it exactly to the reference photo, but rather just look at it on it's own merit. I know from past experience that I will set it aside and catch a glimpse of it later and continue to be very pleased with the end result.

I have a second reference photo and line drawing in ink of another trillium - this time with an open blossom. So, that will be next on my list!

What do you have on your drawing table or workbench this week?

Tuesday, March 6, 2012

Update - Trillium Almost Done!

I have been working more on the trillium and am getting closer! 


This is what it looked like yesterday (above), as I continued to add layers of color on all three leaves.


And this is what it looks like today, after additional layering, mostly the olive green. I added dark indigo (9201-157) to the mix to deepen the shadow areas and still need to blend those in more as well as darken more, especially on the leaf on the far right. 

As I have read in many instruction books, using a dark blue/indigo or sepia is a better way to deepen shadow areas as it provides depth and doesn't make it as flat or stark as black.

I need to set it aside and look at it with fresh eyes later or tomorrow, pull out some highlights and further darken shadow areas, then make sure the blending works overall.

This is the part that I find most difficult and most rewarding. If it continues to come together and I can 'see the end' then it gets exciting. However, often at this stage, I find that I blend too much and it gets overworked.

What do you find to be the most difficult part of a painting or drawing?

Saturday, March 3, 2012

Making Progress - Trillium in Ink and Colored Pencil


I am making a bit of progress on the trillium (Trillium grandiflorum). I have continued to layer the permanent green olive (#9201-167) over the darker deep cobalt green (#9201-158) layer. 


I will continue to layer until I get all three leaves colored. Then I will work on refining the shading, deepening shadows, lifting out highlights, etc. Stay tuned!  

What are you working on these days?


Saturday, February 25, 2012

Work-In-Progress: Trillium in Ink and Colored Pencil

Today I wanted to give you a peek of the drawing I have in-progress. Finally! A chance to get back to pencils and paper. :) I absolutely love working with my beads, but very much missed drawing. So, I decided to be patient, get the pencils out and work on this a little bit at a time.
 
What am I working on? A wildflower illustration! I created two ink drawings of white trillium (Trillium grandiflorum) from reference photos taken while on a wonderful weekend art retreat to Pierce Cedar Creek Institute in Hastings, MI last spring. (You can read my posts about the retreat for details.) I wanted to start adding color to one of them. 

I prefer working with colored pencil when adding color, so I brought out my favorite Faber-Castell Polychromos pencils. My paper is also one of my favorites, Fabriano Artistico, 140 lb, hot-press watercolor paper. This takes both the ink and the colored pencil well, so it's a great choice for these types of illustrations. This particular piece is on a 9" x 12" size sheet.
 

I did some test swatches on a separate sheet of paper to compare colors to the reference photo. I also wanted to start with the darkest shadow areas, and decided that a base layer of deep cobalt green (#9201-158) would be best. This is more of a blue-green, and you can see the areas where that is the first layer.


On top of that, I began layering permanent green olive (#9201-167). Again, you can see where I started adding that and how it begins to bring more depth to the shaded areas.

I have a few other greens that I will layer in as I go, including pine green (#9201-267), may green (#9201-170) and earth green (#9201-172).

Here is the drawing with the reference photo so that you can see what I am working with:


The key for any colored pencil drawing like this is PATIENCE!! I tend to want to get it done in the limited time I have to work on something, but end up rushing it and not taking my time to really layer properly. 

The other important key in colored pencil work is a *sharp pencil point*. This is emphasized over and over in all of the drawing books I have, particularly on botanical illustration. A sharp point allows you to blend layers of color more smoothly and create the details needed without making it flat. This all combines to create a richer drawing with depth and detail.

Do you work with colored pencil? What do you like best about the medium? What is the most frustrating for you?

Wish me patience and sharp points and I will keep you posted on my progress!

Friday, January 27, 2012

New Jotter Journals!

QUICK UPDATE: I have been working on some new jotter journals to list in my Etsy shop and just put my first set up. 


These feature a print of my American Red Raspberry plant illustration. I look forward to creating more sets featuring other original illustrations including more botanicals, natural objects and wildlife. Stay tuned!


Saturday, December 24, 2011

Merry Christmas!

I just wanted to take a moment to wish all of my readers a very Merry Christmas and Happy Holidays! 

I thank you all for following along and for all of your comments, which I so enjoy reading. I look forward to having you join me for a new year full of artistic adventures!

Ink and colored pencil study of my Christmas cactus.

Friday, November 4, 2011

A Beautiful Fall Leaf!

Finally, some new artwork! I had a rare opportunity this afternoon - toddler was napping and my older daughter and her friend were out in the yard playing on this gorgeous, fall day. They were bringing me leaves and this little gem was in the stash. 

I haven't looked up what tree this is from - any ideas?

I was able to do an ink and colored pencil drawing on Fabriano Artistico (extra white) 140 lb hot press watercolor paper. I used my Faber Castell Polychromos pencils. 

I really love the green and yellow mottling in the center and the rich reds throughout the leaf. Glad I drew it as soon as they brought it in as it's already mostly brown and the vibrant colors have faded.

What fun, autumn arts and crafts have you been up to lately?

Saturday, October 8, 2011

Colorful Edibles! A new coloring book by the ASBA.

Hot off the Press! The American Society of Botanical Artists (ASBA) has published a wonderful new coloring book, Colorful Edibles. It features 28 pages of delicious line drawings by 26 ASBA members selected from nearly 80 submissions. I am excited to say that two of my drawings have been included! 


You can find my garlic scapes on p. 14 and my raspberry plant on p. 22.


Contributing artists are: Bobbi Angell, Mary Bauschelt, Beverly Behrens, Irene Blecher, Doreen Bolnick, Silvia Bota, Carol Creech, Carrie DiCostanzo, Jan Denton, Beverly Duncan, Joel Floyd, Keiko Fujita, Gretchen Halpert, Carol Hamilton, Wendy Hollender, Lois Jackson, Jeanne Kunze, Marjorie Leggitt, Derek Norman, Suellen Perold, Kelly Leahy Radding, Maryann Roper, Nancy Savage, Pauline Savage, Judith Scillia and Kelly Sverduk.

Informative and attractive, the coloring book makes a great gift for children of all ages. Proceeds from sales benefit ASBA's educational programs. The book will be for sale at this month at the ASBA conference in Boston, and if you are interested in ordering, please contact the ASBA for details:  

Phone: 212-691-9080 or Toll free tel (USA only): 1-866-691-9080

Thursday, September 8, 2011

Broccoli Leaf - Ink and Colored Pencil - Advice?

I am working on a broccoli leaf in ink and colored pencil, but am having trouble with the color. 
The leaf is actually sort of bluish-gray/green with an almost chalky look to it. I can't seem to find any pencils in my current stash to render it correctly. I am using Faber Castell Polychromos and so far on this have used light green, permanent green olive and chrome green oxide. 
I have many layers to go yet, but this shows you the initial stages of shading. The stem and underside of this particular leaf were more in the sun and do indeed have a yellow-green hue, but the top part of the leaf is almost a white-gray-blue-green. I am trying to figure out what colors to use in addition to how best to layer them. It will take some experimenting, for sure! And perhaps a purchase of some additional pencils.
  
Do you have any advice on how to get the blend of colors right? I'd love to hear from you!
I will keep plugging away and post more in-progress updates as they develop. Thanks!

Thursday, August 25, 2011

Mousepads from Zazzle - they look great!

I recently ordered three of my designs on mousepads from my Zazzle store. They arrived yesterday and look fantastic!

The images printed up very well - crisp and clear with bright, true colors. Gorgeous! I am very pleased.


Japanese Crane - original done in ink and colored pencil.


American Red Raspberry - original done in ink and colored pencil.


Rose with buds - original done in colored pencil.


The holiday season is approaching faster than you think! You can find all my mousepad designs in my store here: mousepads

Keep these in mind for a useful and decorative gift for friends, family, employees and co-workers!


Wednesday, July 6, 2011

African Daisy Blossom - Graphite Sketch

I've been busy traveling a bit lately and haven't had a chance to do much drawing. But I am tired of looking at my last post! :) So, I figured I would upload a sketch I did a few years ago of an African Daisy blossom. 

I love the unique shape of the petals, which are also known as a Spoon Daisy or Spider White. Hope you enjoy it, too!

Saturday, June 4, 2011

Trillium line drawings in ink

I have started working on some wildflower drawings using sketches and reference photos I took on my art retreat last month. Here are two line drawings of trillium wildflowers. My goal is to work on adding colored pencil to these. Stay tuned to see how they are coming along!


Thursday, June 2, 2011

Working on some more fabric designs - flowers, lions. stripes, oh my!

I have been doing a little more work on my designs in Spoonflower - adding some slight variations to my botanicals can transform a pattern. For example, this new design featuring my purple cyclamen could be used in a number of ways, but I can see it as a delicate scarf!


Another example is my rose with buds - can you tell I like stripes?! :)


I also have gone back to black and white with this lion study in pen and ink. I could see this being used as-is or paired with a solid fabric for a quilt, tote bag, place mats, kitchen tea towel and more.


What colors or patterns do you like in your home or for projects?

Thursday, May 19, 2011

Giveaway! Botanical Art Note Cards and Matching Seals

It's giveaway time!
In honor of spring, I am excited to offer another give away, this time it's a set of 5 of my botanical note cards with matching botanical seals! The set includes the following illustrations:

  • African Daisy
  • Purple Cyclamen
  • Daffodil
  • Woodland Peony Seed Pod
  • Tulip 
Along with each card, the winner will receive 4 matching botanical seals for a total of 20 seals! Three of the cards are "thank you" notes, and all of the cards are blank inside. These make terrific additions to your stash of note cards for thank yous, congratulations, birthdays or other greetings. The set also makes a lovely gift for the gardener, botanist or flower-lover in your life!


Each card is:
  • 4" x 5.6"
  • Printed on ultra-heavyweight (120 lb.) card stock with a gloss finish.
  • Each card comes with a white envelope and is blank inside.
The seals are:
  • 1.5" x 1.5"
  • Gloss finish

To Enter

Leave a comment on this post with your name and contact information (email address or website/blog address is fine), by Thursday, May 26, at 12 noon (EDT), and I will use a random number generator to choose the winner. 

For extra chances to win, leave an additional comment here to tell me if:
  • You already follow my blog OR you have become a follower
  • You have posted about this giveaway on your blog (please include a link to the post)
  • You have posted about this giveaway on Facebook or Twitter (please include a link to the post)
  • You go to my Facebook page and "Like" it! Or, if you are already "liking" it.
All of these cards, seals and much more can be found at my Zazzle store. Please stop by for a visit!


Be sure to tell your friends about the giveaway!
And thanks for visiting!

Wednesday, May 4, 2011

Pierce Cedar Creek Institute Art Retreat - Part 2

So, what kinds of things did I get to draw on my art retreat weekend? Take a look below!

[See Art Retreat - Part 1 for details on PCCI where the retreat was held.]

Most of these drawings were done in the field as I stopped when something caught my eye. I wanted to include color in some of these, so I made a point to do some sketches with ink and colored pencil. It really helps with the wildflower sketches since I wanted to capture what I was seeing at the moment and do my best to identify them.

As you can see, I often scribbled little swatches of color on the side of the page to see if it would match before adding it to the drawing. I used a tan-toned paper for this first drawing of beautiful little spring beauties (Claytonia virginica) that were all over the woods, many right alongside the trails. I think the paper gives the drawing some warmth, and I like drawing a white flower on toned paper. A number of the talented artists who were at the retreat with me already have a good grasp on the local flora, so I was able to identify these very quickly with their help.

I spent a good bit of time sitting on the ground (on my trusty garbage bag to stay relatively clean and dry) drawing the details of this small plant which was only about 4-5 inches off of the ground.

Spring Beauty (Claytonia virginica)

I continued my walk along one of the trails and kept seeing small trees with these gorgeous, papery leaves that were all curled up. I believe these are beech trees and so I stood for a bit right in front of this tree and drew some of the leaves in graphite pencil. I love the shapes. They looked like speckled parchment, all rolled up.

American Beech Tree and Leaves (Fagus grandifolia)

Right after I had done the leaves, I thought I should do some more walking and not just sit in one spot all day! But then I saw this little peek of yellow on the ground and found a beautiful trout lily. Again, I didn't find out the name until later when I showed someone my sketch. They have graceful, bell-shaped flowers with really interesting, mottled leaves. The color in the sketch below wasn't quite right on the leaves, but it was the best I could do with the pencils on hand. The leaves were sort of thick with almost cloudy light green patches mixed in with darker purple/brown mottling. The drawing and colored pencil work here isn't as nice as I had hoped, but I took lots of photos of this one and others I saw later so I plan to do a nicer, finished piece sometime.

Yellow Trout Lily (Erythronium americanum

I included this sketch of mushrooms on a log to show that field sketching often includes partial and not-so-attractive drawings. The point, though, is to work on visually capturing things that I was seeing. It doesn't have to be perfect, but I will always remember crouching by the ground doing a quick pen sketch of this.

Mushrooms on Log

These beautiful, red flowers were growing right in the bed near the Education Center. We think they might be a wildflower called Prairie Smoke. They had not quite bloomed yet and it was too windy right up on the sidewalk every time I went to draw them, so I just did a couple of quick sketches and took some photos for future use.

Prairie Smoke?

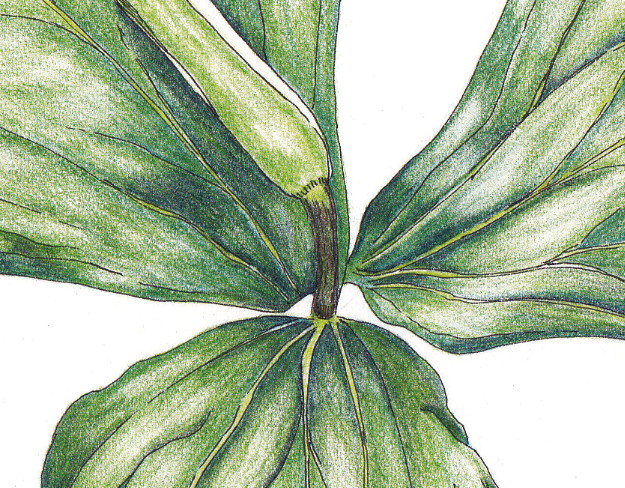
Finally, on Sunday, we did some more hiking where there were lots of wildflowers, and I saw a delicate little flower called Dutchman's Breeches. There are multiple flowers on one stem, so it was hard for me to capture in a quick sketch. They do have these frond-like leaves, so I drew part of one in this study. We also saw a number of white trillium, some of which were not yet blooming and some that were. I had a chance to sit and study some leaves and wanted to capture the drape and venation pattern of them, so I didn't mind that it had no flower yet. Again, I have tons of reference photos, so this is on my to-do list as well.

Dutchman's Breeches (Dicentra cucullaria) and Trillium Leaves (Trillium grandiflorum)

I hope you enjoyed following along on my art retreat adventures! The weekend went entirely too fast. I am definitely inspired not only to do more artwork, but to start exploring some of my local parks and of course the Arboretum here in Ann Arbor as the weather warms up!

Have you had a chance to do any field sketching or nature observation lately? I would love to hear about what you have done!


Thursday, April 21, 2011

ASBA Member Profile is up!

I have been a member of the American Society of Botanical Artists for a few years now. It is a wonderful nonprofit organization "dedicated to to promoting public awareness of contemporary botanical art, to honoring its traditions, and to furthering its development." 

ASBA Membership is open to all artists and others interested in furthering the development of botanical art and members currently include over 1200 professional artists, students, botanists, collectors and gallery owners, and botanical institutions from throughout the United States and 25 countries around the world.

Members have the option of having a profile page appear in the online Members Gallery, and I finally got around to creating a profile and choosing two images to post. I am very early in the process of developing my botanical art skills, but am proud to be listed among so many talented and amazing artists. 

Take a look around! It's a wonderful feast for the eyes.


Monday, April 4, 2011

Circle of Art 2011! Turning Art into Food.

Circle of Art is a wonderful local fundraiser hosted by the Saline Picture Frame Company in Saline, MI. This year is the 7th annual event. Local artists donate small works of art that are posted online for bidding. On May 15, a party is hosted by Saline Picture Frame Company where all the art can be seen in person and further bids accepted in a silent auction. All of the proceeds go to benefit Food Gatherers

The money raised over the last six years from the sale of these small pictures, sculptures, fiber works, jewelry and more has enabled Food Gatherers to provide more than 125,000 meals to local people in need.

If you are a local artist, consider donating something! Artists can donate up to two pieces and donations are accepted through April 29.

Check out all of the wonderful donated artwork! You can see my original purple cyclamen drawing that I donated today. 


Related Posts Plugin for WordPress, Blogger...