Saturday, December 31, 2011

Happy New Year!

And here we are to New Year's Eve already! I want to wish each of you a very happy, healthy, creative new year in 2012!

I thought I would round out this year's posts (my 200th, in fact - wow!) with some images of gifts I created over the holidays. I was bracelet-crazy this year and had a wonderful time making these for friends and family:


Double wrap in 1.5mm brown leather with 4mm sodalite beads and a dark blue button closure.


Double wrap in 1.5mm brown leather with 4mm sodalite beads and a pearly button closure.


Double wrap in 1.5mm brown leather with 4mm lapis lazuli beads and an antiqued gold metal button closure.


Single leather wrap with 6mm flower amethyst beads and a cute purple and silver button closure.


Red leather macrame bracelet with a cute candy-cane striped bead for the closure.


Double wrap with 1.5mm dark brown leather 
and gorgeous 6mm Tiger's Eye beads and a swirly brown and tan button for closure.


Double wrap black leather with elegant 4mm cat's eye quartz beads and a black button closure.


Another double wrap with black leather and 4mm cat's eye quartz beads, this time with a cloth-covered black button closure.


Double wrap in 1.8mm black leather with beautiful, vibrant green malachite beads and a faceted black button closure.


Double wrap with dark brown leather and 4mm Charoite beads. The swirls of browns, earthy greens and golds in the beads matched very well with the leather and gold metal closure.


Double wrap with 1.5mm black leather with fun snowflake obsidian beads and a silver metal flower button closure.


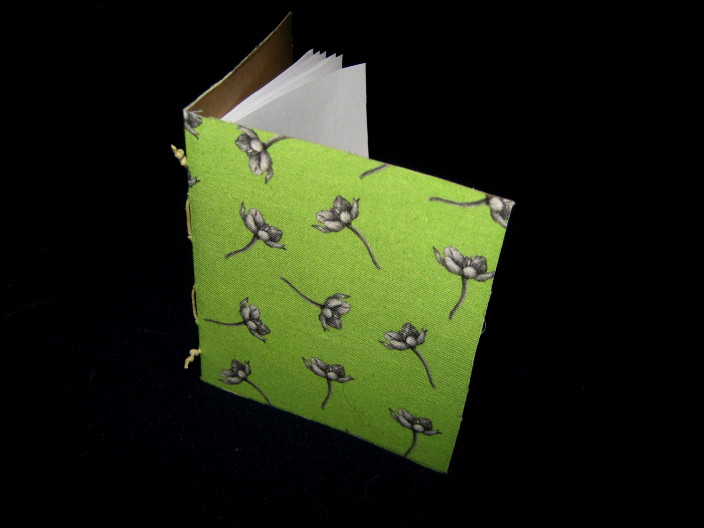
I also did a couple of additional jotter journals with some of my Spoonflower fabric swatches.


This is small jotter, approximately 3" x 3.5" made with 32 blank pages for notes, lists, doodles, etc. I used waxed linen bookbinding thread to sew in the pages and added a few white beads for embellishment. This is quilting weight cotton fabric in my roses pattern.


This small jotter is also approximately 3" x 3.5" made with 32 blank pages for notes, lists, doodles, etc. I used dark green s-lon beading thread to sew in the pages and added some flower amethyst beads on the spine for embellishment. This is quilting weight cotton fabric in my cyclamen pattern.


I am looking forward to a new year of creativity, drawing, beading, and perhaps more bookbinding. I am also interested in opening an Etsy shop, and I have some of my own ideas of what I'd like to include...what things would you like to see there?

Well, stay tuned for more creative adventures. I'd love to hear about the new things you are hoping to try in the new year, too, so let me know!

Happy New Year!

Saturday, December 24, 2011

Merry Christmas!

I just wanted to take a moment to wish all of my readers a very Merry Christmas and Happy Holidays! 

I thank you all for following along and for all of your comments, which I so enjoy reading. I look forward to having you join me for a new year full of artistic adventures!

Ink and colored pencil study of my Christmas cactus.

Thursday, December 22, 2011

More Jotters! Wrapped Edges and End Papers.

These are for you, Anita! :)

My friend Anita made a comment on yesterday's jotter journal post about my edge-fraying problem. We both agreed that wrapping the edges of the fabric around the card stock would be a good solution. I wasn't sure if it was worth the time to do that and include end papers since this is such a quick project. However, I decided to try it today and it worked beautifully! It really did not take much longer to do and I think it gives a much more finished look to the journals.

So, in today's experiment, I created two new little jotters. Both were done using my Tree Stripes fabric in cotton silk. It has a lovely sheen and gives a slightly fancier look to the finished product. 

The first is about 3" x 3.5" and in addition to wrapping the fabric around the edges, I also sewed the pages in a bit differently, adding a large, decorative bead at the bottom for a little embellishment.

After gluing the card stock to the fabric, I trimmed the edges an prepared to glue them down. I also cut end papers to fit. What isn't shown here is that I had to trim diagonally across the corners leaving about 1/8" fabric so that when the edges were folded there wasn't too much bulk.

 
 I glued the fabric edges down using my glue stick and after they dried a bit (under some waxed paper and a heavy book), I trimmed up the little bit of extra sticking out in each corner.

 Finally, I glued down the end papers, again using my glue stick and pressing it under some waxed paper and a heavy book to dry.

 The finished product! The quarter is in the photo for scale.

The second was inspired by the work of Louise Thompson, an artist from New Zealand, who makes incredibly beautiful and often miniature leather-bound journals. Check out her sites - she has a blog as well as an Etsy shop. Her shop is under the name Bibliographica. If you enjoy bookbinding at all or miniature things, you will really love it.

Anyway, my mini jotter is just 1 1/4 " square. It was made using the same cotton silk fabric in the Tree Stripes print. 

Both journals have 32 pages of blank paper inside for little lists, notes, doodles, or thoughts. Also, the mini is very handy for my 4-year-old daughter who is using it as a book for her stuffed animals. :)


NOTE: I did both of these earlier today off and on with interruptions from the kids, drying time, etc. It really was a quick project. I can see me doing lots more of these.

Wednesday, December 21, 2011

My first Jotter Journal Attempt!

What do you do with your extra fabric swatches and scrap pieces?

I discovered one great way to use them - create a jotter journal! What are jotter journals, you ask? They are little notebooks, quickly made, that you can drop into your purse or work bag to jot down notes, grocery lists, to-do items, etc.

Being a list-maker myself and accumulating quite a stack of Spoonflower swatches from recent proofs, I decided this was the perfect way to use some of them up to create fun, unique little jotters.

I first came across this idea at The Creative Place, an art and craft blog by Ashley Connelly. She recently posted a wonderful tutorial on creating these so I finally gave it a try. Here is the final result!
 

Ashley's tutorial gives all of the step-by-step details, but I modified my project a bit according to what supplies I had on hand as well as the fact that my machine sewing skills leave a bit to be desired. My supplies included:
  • Kraft cardstock - cut to approximately 6" long by 3.5" wide
  • Plain white computer paper - 8 sheets cut to approximately 6" long by 3" wide
  • Fabric swatch - I used a swatch of quilting weight cotton in my Orange Star blossom print. Because of the small journal, I have just enough of the swatch leftover for another jotter of this size.
  • Glue stick - craft size...it's a little wider than your average glue stick. Ashley used spray adhesive.
  • Waxed bookbinder's thread - about a 5-6 inches. This is for sewing the pages to the cardstock. It is what I have on hand, though you could use embroidery thread, yarn, or other decorative cord. Ashley sewed her pages in on her sewing machine.
  • Heavy needle with a big eye - mine is a bookbinder's needle that I had from a kit I bought one time.
  • Two bulldog clips, or other binder clips
  • Scissors
  • Credit card for smoothing the fabric.

I won't go into each step here, but I followed Ashley's tutorial, substituting my supplies as needed. 
  
RESULTS and TIPS: 

I found that the glue stick seemed to work just fine for adhering the fabric to the cardstock. Definitely make sure you get glue all the way to the edge of the cardstock and make it an even layer (no clumps of glue or it will bleed through the fabric.) One problem I seem to still have is a bit of thread here and there peeling away from the very edge. I'm not sure what the best fix is for that aside from folding the fabric over and gluing the edge to the inside of the jotter. But then you need to create end papers to cover the exposed fabric edge and it becomes a more involved project. Perhaps it is not a huge deal for an informal jotter like this?

The other big difference in my project was that instead of using a sewing machine to sew the pages to the cardstock, I simply cut a length of my waxed bookbinding thread, poked 6 holes, evenly spaced, in the pages and cardstock, and hand-sewed the pages in. 


I put two small knots on the outer threads to hold it in place. You could get fancy and leave a longer tail on the bottom and add a decorative bead to it if you wanted. Or, you could also sew in a little closure that wraps around the journal horizontally. The bookbinding possibilities are endless! :) But for this simple on-the-go jotter, I thought a few well-placed stitches in the center would do just fine.


I am looking forward to creating more of these little gems with other fabric that I have. I might even get crazy and put some of my good drawing paper and create an on-the-go sketch journal! Lots of great ideas brewing. Let me know if you give this project a try - I'd love to see your results!

Thursday, December 15, 2011

Stehekin MailArt Project! Celebrating a Tiny Town's Post Office.

There is a really fun art project going on right now. It's called Stehekin MailArt and it's being put together by artist Earnest Ward. From the Facebook Event page description:


Stehekin is a small isolated township of 85 year-round residents located at the upper tip of Lake Chelan in Washington state. It is also the southern gateway to some of the most breathtaking scenery (and over half the glaciers) in the United States. Stehekin has no outside road access, no telephone landlines, no cellphone service. The post office serves as a link to the outside world, community bulletin board, and provisioning point for Pacific Crest Trail hikers.

Join us in celebrating the USPS decision NOT to close the township's post office by sending in your mail art.

SUBMISSION DEADLINE: Dec. 30, 2011
INSTALLATION: Jan. 15, 2011


The project website has additional details on what you can send (there are three themes - maps, fauna, mountains) and how large/small the artwork needs to be, as well as the mailing address.

I wanted to send one of my illustrations on a postcard. It didn't quite fit one of the themes, but I modified it a bit to be map-like. This is what I sent in today:


All of the artwork received will be posted on the website and in January will be installed in Stehekin's Golden West Gallery. What fun! 

There are still two weeks to go and Earnest has mentioned that the deadline is a bit loose so as long as things come in by January 15, it should be able to be included.  So, get your creative juices flowing and send something out!

Saturday, December 10, 2011

Holiday Fabrics! Poinsettia now available.

And here are a couple more for you! I took advantage of the recent fat quarter sale at Spoonflower and ordered a length of my poinsettia fabric in organic cotton sateen. It turned out beautifully! It's an elegant, simple design in black and white, based on my original pen and ink illustration of a poinsettia flower. 


I also ordered a length of linen cotton canvas in my holly print.


Either of these would be great for holiday decor (placemats, table cloths, etc.) or even as reusable wrapping for gifts! 

Hope you are enjoying the season so far!

Wednesday, December 7, 2011

New Fabric Designs For Sale!

I love seeing a Spoonflower package in the mail :)

I received proofs of 6 new designs - all of which are now available for purchase! I was really interested to see how my Orange Star Blossom design printed up. It is based on my original graphite illustration of a beautiful little blossom from an Orange Star plant (Ornithogalum dubium). 

I put it on several different backgrounds, including a dark blue, medium green, and white. I also did some variations on the blossom itself in my photo editing program and came up with a variation with an orange flower on a white background. All of these are a smaller-scale print that would look great on napkins, placemats, quilts, or other home decor.


Orange Star Blossom on Blue. This sample is printed on the limited edition cotton poplin fabric.

  
Orange Star Blossom on Green. This sample is printed on quilting weight cotton.

Both of the samples below are printed on the organic cotton sateen, which has a bit more sheen to it. The photos don't show that as well since I wanted to make sure you could see the design.


I also had my Tree Stripes, a complimentary fabric for my Trees collection, printed on the wonderful, new cotton silk. It's beautiful! I love the richness and shine.


Finally, I had one of my new Red Leaf in Autumn designs printed. It looks gorgeous! This sample is a fat quarter on organic cotton sateen


Do you have a favorite one from this most recent batch? Or maybe you go for a different style altogether? I'd love to hear about your favorite fabrics and colors!

I think I'll have to start brushing up on my sewing skills. I'm starting to accumulate a nice stash of samples! Just like a blank piece of paper, there is nothing like the potential of a length of fabric. It's just begging to be transformed into something beautiful. :)
Related Posts Plugin for WordPress, Blogger...