Showing posts with label art retreat. Show all posts

Sunday, April 28, 2013

Pierce Cedar Creek Institute Retreat 2013! Afternoon of hiking and sketching...

If you have been following along, you know that I had the opportunity to spend a wonderful day at Pierce Cedar Creek Institute yesterday at an art retreat. I, along with about 8 other nature artists, spent time together catching up and creating some new artwork. We had a fantastic introductory class in etching with PCCI's first artist-in-residence, Doet Boersma. Read about it in my previous post.

After our etching class and a tasty lunch, we all spent the afternoon hiking the many trails at PCCI, sketching and painting whatever caught our attention. After such a long winter, it was a pleasure to have temperatures in the 60s and lots of sun! The woods are just starting to bud and spring plants are beginning to bloom.

I decided to hike one of the easier trails so I had plenty of time for drawing as I spotted wildflowers or other interesting subjects.

Three of us headed down toward the boardwalk behind the visitor's center, passing many,  pretty little spring beauties (Claytonia virginica) along the trail. These delicate, pink-striped flowers are among the first to pop up through the leaf litter each spring.


As we headed onto the boardwalk, I spotted a few blooming marsh marigolds (Caltha palustris). I missed the chance to sketch them last time I was here, so I set my gear down and decided to do a little drawing.


Marsh marigold sketches are in graphite at the top of the page. Another plant that we saw everywhere was skunk cabbage (Symplocarpus foetidus). They have some really interesting shapes and colors, so I had to stop and capture those, too. I ended up doing graphite and added colored pencil on top. Not the best combo, since it gets muddy and smears. But I wanted to add some color to indicate the deep maroon next to the light yellow-green in the same plant. 

In the swampy area near the rest of the skunk cabbage, I did a quick sketch of a tree with bright green moss growing by the roots. I chose to use gray toned paper for this one.


 Tree with skunk cabbage growing all around.


 My quick sketch on toned paper. I didn't do a great amount of detail, but really wanted to capture a bit of the moss.


I made my way up the blue trail to the Maple and Beech forest next. This is one of my favorite spots and one I visited before. The beech trees look so beautiful and delicate, especially the smaller ones, with their papery white leaves rustling in the breeze. 


Along this whole area, the forest floor is covered in leaf litter and other winter debris, but up throughout all of those leaves, sometimes growing right through them, are the spring wildflowers. I saw trout lily (Erythronium americanum) leaves everywhere, but only one blossom so far. My guess is that in the next week or two, that area will be bright with the curling stems and yellow blossoms. 


I also spotted more spring beauties and some clumps of light purple flowers that are slightly bigger than spring beauties. They also have a wonderful, hairy white stem. I believe these are hepatica
 

I found one with its three-lobed leaves intact and did some sketching on the same toned gray paper as the tree I did earlier. 


After I finished this study, I simply enjoyed walking the rest of the trail, looking for more flowers and listening to the birds singing. 

My last interesting find was right at the edge of the trail as it came out of the maple and beech forest into the prairie section. It was sunny on the path and I had my walking stick with me, as usual. I was studying the left side of the trail for wildflowers and heard a rustling off to my right. I stopped and saw a thick snake, about 14 inches long, with light tan and brown markings. 


It blended in perfectly with the surrounding leaf litter. It has stopped and was waiting for me to move on. Can you see it in the photo above? Its head is toward the top of the photo, right in between the sideways "V"-shaped tree branches and has two black patches on either side.

I took my camera out and captured a few photos before moving on. It flared its head out as it waited for me to leave, reminding me of a cobra. I thought it might be the elusive Massasauga rattlesnake, Michigan's only venomous snake. 

However, further research when I returned home revealed this to actually be an eastern hog-nosed snake. It is often mistaken for the Massasauga rattlesnake. Those dark head markings really clarified it for me - in any photos you see, the Massasauga has more of a striped appearance. Also, I read that the hog-nosed snake tends to flare its head when disturbed. Either way, a rare and beautiful sighting!

We finished the day by gathering in Doet's studio again to pick up our etching prints that we created earlier in the day and exchange business cards and contact information. I am so glad to have had the chance to visit PCCI and my artist friends, even if just for one day. I look forward to returning again!


Pierce Cedar Creek Institute Retreat 2013! How I spent the morning...

I had an opportunity to return to Pierce Cedar Creek Institute (PCCI) in Hastings, MI yesterday for an artist's retreat. I had a terrific time and met a great group of artists two years ago when we went.

Many of the same folks and a few new ones gathered again this weekend. I was only able to go for the day, but it was a gorgeous day. Temperatures were in the high 60s and the sun was shining. Fabulous after this long, cold winter! I managed to get some good sketching done and also had a surprise workshop from the first PCCI artist-in-residence, Doet Boersma

I arrived to PCCI at 9 a.m. and the day simply flew by. We started the day by heading to Doet's studio. She is an amazing artist and so generous to share her knowledge, time and equipment with us. A gracious host, she made sure we had our coffee or tea before we started! Then she proceeded to give us a quick class on etching (technically, drypoint - using an etching press to make prints.) We each chose a drawing or photo - either something from our sketchbook or a photo of our own from online that we printed out. I chose to work with one of my magnolia photos that I took last summer in South Carolina.

From there, we each cut a small piece of plastic binding cover material and chose an etching tool, which could be anything from a screwdriver to a scratchboard point or whatever hard-tipped scratching tool you prefer, as long as you can scratch your design into the plastic. The focus is on scratching the dark areas of the design as the print will be done in reverse, e.g., whatever you scratch the most will retain the most ink and print the darkest.


It turns out that my choice was a little ambitious since there is a good bit of dark background around the magnolia blossom and within the leaves. However, I plugged away and managed to get something decent to work with on the press.

Once our designs were finished being scratched into the plastic, Doet showed us how to choose various ink colors, with darker ones working best, roll them out and coat the plastic or "plate", working ink into the scratched areas with our gloved fingers, if needed. After wiping the excess ink off, we held the plates up to the light to see where we wanted to remove or add a little more ink. Using cotton swabs, I was able to take more ink off of the white flower to bring more light into the design.


Once we finished inking, we took a piece of water-soaked cotton rag paper that we prepared earlier and placed it onto a scrap piece of paper on the etching press. Carefully, I centered my etching ink-side down on the damp paper and put another scrap piece on top. I rolled the blanket layers down and then cranked the press to create a print. You can reuse the plate again and again, applying more ink, different colors, choosing to darken or lighten areas depending on how your print comes out.

My first print included mainly some green ink and turned out alright, but I wanted to tweak it some more.

First of 3 "magnolia" prints.

For my second print, I  added some brown ink to the background and darker areas, but clearly did not incorporate it as well!
 
 Second of 3 "magnolia" prints. 

My final print turned out the best, I think. I incorporated some reddish-brown ink and pulled out some highlights in the flower and bud a bit more. The sepia tones really compliment the magnolia as the back of the actual leaves is a rich, red-brown color.
 
  Final of 3 "magnolia" prints. 

It was such a fun process! Once we all did our first print, you could feel the creative energy rising in the room as people started thinking of how they wanted to tweak their prints, bustling about for more paint, wiping their plates to get the right amount of ink and "dirt" in the background. Everyone did at least 3, some 4 or 5. It was a productive few hours! Great to learn more about this traditional craft.

We left the prints to dry while we took a lunch break and spent the afternoon outdoors. Stay tuned for my next post with photos and sketches from the afternoon hike!

Wednesday, May 4, 2011

Pierce Cedar Creek Institute Art Retreat - Part 2

So, what kinds of things did I get to draw on my art retreat weekend? Take a look below!

[See Art Retreat - Part 1 for details on PCCI where the retreat was held.]

Most of these drawings were done in the field as I stopped when something caught my eye. I wanted to include color in some of these, so I made a point to do some sketches with ink and colored pencil. It really helps with the wildflower sketches since I wanted to capture what I was seeing at the moment and do my best to identify them.

As you can see, I often scribbled little swatches of color on the side of the page to see if it would match before adding it to the drawing. I used a tan-toned paper for this first drawing of beautiful little spring beauties (Claytonia virginica) that were all over the woods, many right alongside the trails. I think the paper gives the drawing some warmth, and I like drawing a white flower on toned paper. A number of the talented artists who were at the retreat with me already have a good grasp on the local flora, so I was able to identify these very quickly with their help.

I spent a good bit of time sitting on the ground (on my trusty garbage bag to stay relatively clean and dry) drawing the details of this small plant which was only about 4-5 inches off of the ground.

Spring Beauty (Claytonia virginica)

I continued my walk along one of the trails and kept seeing small trees with these gorgeous, papery leaves that were all curled up. I believe these are beech trees and so I stood for a bit right in front of this tree and drew some of the leaves in graphite pencil. I love the shapes. They looked like speckled parchment, all rolled up.

American Beech Tree and Leaves (Fagus grandifolia)

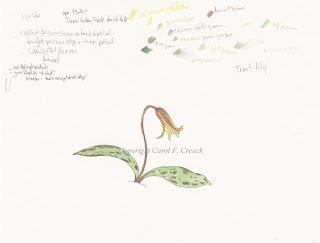
Right after I had done the leaves, I thought I should do some more walking and not just sit in one spot all day! But then I saw this little peek of yellow on the ground and found a beautiful trout lily. Again, I didn't find out the name until later when I showed someone my sketch. They have graceful, bell-shaped flowers with really interesting, mottled leaves. The color in the sketch below wasn't quite right on the leaves, but it was the best I could do with the pencils on hand. The leaves were sort of thick with almost cloudy light green patches mixed in with darker purple/brown mottling. The drawing and colored pencil work here isn't as nice as I had hoped, but I took lots of photos of this one and others I saw later so I plan to do a nicer, finished piece sometime.

Yellow Trout Lily (Erythronium americanum

I included this sketch of mushrooms on a log to show that field sketching often includes partial and not-so-attractive drawings. The point, though, is to work on visually capturing things that I was seeing. It doesn't have to be perfect, but I will always remember crouching by the ground doing a quick pen sketch of this.

Mushrooms on Log

These beautiful, red flowers were growing right in the bed near the Education Center. We think they might be a wildflower called Prairie Smoke. They had not quite bloomed yet and it was too windy right up on the sidewalk every time I went to draw them, so I just did a couple of quick sketches and took some photos for future use.

Prairie Smoke?

Finally, on Sunday, we did some more hiking where there were lots of wildflowers, and I saw a delicate little flower called Dutchman's Breeches. There are multiple flowers on one stem, so it was hard for me to capture in a quick sketch. They do have these frond-like leaves, so I drew part of one in this study. We also saw a number of white trillium, some of which were not yet blooming and some that were. I had a chance to sit and study some leaves and wanted to capture the drape and venation pattern of them, so I didn't mind that it had no flower yet. Again, I have tons of reference photos, so this is on my to-do list as well.

Dutchman's Breeches (Dicentra cucullaria) and Trillium Leaves (Trillium grandiflorum)

I hope you enjoyed following along on my art retreat adventures! The weekend went entirely too fast. I am definitely inspired not only to do more artwork, but to start exploring some of my local parks and of course the Arboretum here in Ann Arbor as the weather warms up!

Have you had a chance to do any field sketching or nature observation lately? I would love to hear about what you have done!


Sunday, May 1, 2011

Pierce Cedar Creek Institute Art Retreat - Part 1

Relaxation, creativity and new friends! What a great combination. I just returned from a fantastic weekend art retreat at Pierce Cedar Creek Institute (PCCI) in Hastings, MI (near Battle Creek.) It is a 661 acre public environmental education center whose mission is to promote environmental education, research, preservation, and appreciation.

 View of the back of the Visitor Center, heading over from the Education Building


I met up with nine other natural science artists and illustrators to spend some time recharging our creative batteries. It was a friendly and good-humored group, and I very much enjoyed spending time with like-minded artists in such a relaxing setting. 

There are seven miles of trails to explore at PCCI, many of which are easy to walk and perfect for frequent sketching and painting stops. Everything from fungus covered logs and spring wildflowers to deer, birds, and wetland critters were visible and great subjects for sketches. I was able to squeeze in a few drawings while walking around and will post some this week. I also took a lot of photographs and have a nice stash of reference photos for future project use.

 Part of the Blue Trail

 Part of the Green Trail heading that circles the back of the Visitor Center

Spring Beauties that peppered the sides of many trails

Our accommodations were in Hyla House, a remodeled farmhouse with ten single rooms and one double room, four full baths and a kitchen. It was a charming and very comfortable place to stay with a short and pleasant trail walk to the Visitor Center and Education Building. We didn't need the kitchen at the house, though, as we had wonderful meals in the Visitor Center dining room created by the Institute's chef, Richard Centala.

Hyla House

The weather held out for us rather nicely. The sun was shining brightly on Friday with clear, blue skies. Saturday was a bit windy and cool, but not too bad. And today started out warmer and cloudy, but by the time I left at lunch the sun was back out. We were fortunate to avoid any rain, which allowed for lots of exploring and outdoor time for those who chose to do that. The Education Center and it's classrooms allowed folks to enjoy a beautiful view of the grounds while working on projects indoors or taking a break from exploring the trails.

Sketchbook, pencils, wildflower

Sitting on the trail, on a garbage bag which was handy for getting close to those low-growing wildflowers, I worked on drawing a Trout Lily that you can see off to the left of my sketchbook. A close-up is below. What interesting, mottled leaves it has with a graceful, dangling yellow blossom.

Trout Lily

Even though it was a quick couple of days, I feel entirely different and appreciated having such a great opportunity to change the routine and focus on observing nature for a bit. The creative juices are flowing!

Check back for Art Retreat - Part 2 where I'll post more photos as well as sketches that I worked on this weekend.  Have a great week!
Related Posts Plugin for WordPress, Blogger...