 Are you looking for a unique holiday card? Consider a botanical art card that can be customized to include your holiday greetings. The American Holly above is available for ordering through my Zazzle page:
http://www.zazzle.com/ccreech21*
Cards are available in the traditional greeting card size or in a smaller note card size. Bulk order discounts (in as small a quantity as 2) are available, so the more cards you order the lower the cost per card. It's a great way to obtain distinctive cards this holiday season.
UPDATE 2010: I have also created matching return address labels that can be customized with your information as well as a beautiful ceramic ornament, stickers, and stamps - all featuring my American Holly painting.
It feels like it's been forever since I have posted! It's been a busy few months as I gave birth to our second child late in August. I haven't had much time to draw, but I found this is a sketch of some curling fall leaves in an old notebook of mine. I love seeing both sides of the leaf in a sketch like this - it seems that much more 3-dimensional. Hoping to get back to some regular drawing soon!
I just love the look of poppy buds, but wasn't enjoying trying to render them on white paper because of all the little white hairs on them. So, I found a nice little piece of smooth, green matboard and went with colored pencils. This sketch is the result - I love how it turned out. 
These are some of the actual raspberries from the plant I'd been drawing lately. This was done on Strathmore drawing paper, not the hot-press watercolor I used before. This paper has a bit more tooth and so the texture if a little rougher. I used ink to do the base drawing and then colored pencil over that. It's a more of a rough drawing than the full plant, but I think it is still a fun piece showing the berries as they ripen.
I have finally finished this illustration of a raspberry sprig. This was done from a clipping taken last month, so there were just some blossoms on it, but no berries yet. I layered three different greens on the leaves and just added a bit of ivory over the pen work of the blossoms themselves since they are white/ivory in color.

Making more progress on the raspberry plant...
Continuing the colored pencil. I've done a light shading on all of the large leaves and have begun adding some layers of darker green and then light green on top of that to the leaves on the lower right. I think it's coming along nicely. I'll continue that process with the other leaves, darkening where needed and layering the lighter green on top to brighten and burnish.
So I have started adding color to this ink drawing of the raspberry sprig. I am trying to keep a light hand right now so I don't overwork it. I plan to continue adding shading and color to hopefully give the leaves some depth and form. Stay tuned for more updates!
 This is the raspberry plant in pen and ink. I deliberately just did a line drawing, trying to emphasize heavier lines/lighter lines to show a bit of depth.
I will be using this as a base for my colored pencil rendering, so it will be interesting to see how this turns out!
 I've been working on a drawing of a raspberry plant. It's a cutting that I took from the bush in our side yard. I'm excited to be working from a live plant this time! It really does make all the difference.
I had started with a nice drawing and began inking and doing some colored pencil work, but it was looking rather flat. I realized that I needed to go back to some basics and do a light and shade study of the leaves in particular to get some depth and form back into the drawing.
So, this is the rough light and shade study on tracing paper that I will continue to tweak. I'll use this as a reference point when redoing the original drawing so that my shading/light looks correct in colored pencil. Stay tuned for more progress!
Who knew chives could be so pretty? :) Our neighbors have a bunch of chives in their flower bed and they have a beautiful, light purple flower. When you clip the stem off, you can clearly smell the oniony scent of chives.
The bloom consists of a cluster of small, individual blossoms that together look similar to a thistle. Lots of detail to draw each one, so I settled for a looser interpretation to get the idea across.
I had a chance to try a version of the tulip in colored pencil. It's a beautiful purple/pink color with white at the top of the petals. I had some difficulty rendering the white -- I added shadows in various shades of gray, but am not sure it turned out very well.
If anyone has any suggestions/comments on how you handle this sort of problem - especially when rendering on a white background - that would be appreciated!
This is a graphite study of a tulip from my flower bed. I've been wanting to draw them for some time and finally have had the chance. I hope to do an additional version in colored pencil. This was a good place to start, though, giving me time to really study the shape, shading and form without worrying about color. 
I've continued drawing the maple tree buds out in front of our house. A few weeks ago, I posted them as they were just popping out, all red and berry-like.
In this update, the red covering has fallen off and the bundled, silvery-green leaves are emerging. There are some beautiful red highlights both in the branch and the buds. This was done in pen and ink and colored pencil.
 This is a pen and ink and colored pencil drawing of a Vietnamese mossy frog (Theloderma corticale). I saw these at the Toledo Zoo awhile back and was fascinated by their bumpy, mottled appearance. They blend right in with the moss and rocks in their habitat. On one hand, it was rather difficult to render, but on the other, very fun to just let the pen squiggle around all of the irregular shapes and patterns.
I am excited to announce that I have created a gallery at Zazzle with products featuring my custom illustrations. Check it out and let me know what you think!
I have started with botanical notecards and greeting cards and plan to add more illustrations and products going forward. I'd love to hear from you with any feedback on the gallery along with any suggestions for additional illustrations or products that you would like to see in the future.
This is a rough pen and ink and colored pencil sketch of a daffodil blossom. It was a freebie at the grocery store. They were clearing out flowers that were nearly wilted, so in addition to one for my 2-year-old to hold while we shopped, I asked for one for myself! I could have been a little more delicate on the colored pencil application, but I just wanted to get some rough color laid down to get a sense of the blossom. 
Our maple tree out front has been budding up recently, and the buds look like bright red berries. Very pretty!
I did some loose pen and ink sketching of a branch, and then a close-up sketch of one bud. I then added color to the bud. I've included images of both the pen and ink only version as well as the bud in color. I just love pen and ink, but can't help adding the color in colored pencil these days! I think it livens it up and it is a comfortable way for me to add color since I like working with pencils.

This is a lady slipper orchid that I saw at the Meijer Gardens Butterfly exhibit a few weeks ago. I did work from a photo since I didn't have time to sketch while we were there. I loved the rounded and curled petals and leaves.
I started with just a rough sketch and then decided to go over it in pen and ink. I wanted to add some color since it included such a beautiful purple, so I went over everything with colored pencil. I used three colors in most areas, except for the green stems (just using two there.) It was a relatively quick drawing that I did last night, so I was pleased with how it turned out.
 In Eastern Rite churches, pussy willow branches are typically blessed and distributed with palm branches on Palm Sunday.
The pussy willow branch is both strong and woody, but with very delicate, fluffy blossoms. I first did this drawing in graphite pencil. Then I decided to do the line work in pen and ink, erase the pencil, and add some color with colored pencil. The branch has a bit more reddish in it than came through in this rendering, and the blossoms are quite silvery/white in the highlights.
I enjoyed the view of this particular branch as two of the blossoms still had the papery brown covering on the back, and one blossom at the bottom had fallen off, leaving a few wispy bits on the branch.
I did some additional work on the main flower, the stems, and also the leaf. I think it's finally finished. It's been a fun project to get some practice with the colored pencils.
The rose is coming right along. I spent a good bit of time this evening on the rest of the stems, and then working on the buds and the one leaf study that I included. I thought I might be done, but realized that I still need to work on the center of the rose itself. Still needs a bit of shaping/shading.
So, I'll leave it for now and hopefully do some final touching up to finish it. 
So I have started working on the colored pencil of this rose drawing. It's interesting to study the shading and try to replicate that in color. I have a ways to go yet, but I like how parts of it are turning out. We'll see if that continues! Everything is a learning process... :)
One thing I do notice is that keeping the pencils very sharp and using a light touch helps keep everything blended together. I can then darken shadow areas as needed, without having too much heavy color already on the paper. This also allows for better blending of different colors. For example, on the darkest shadows of the rose itself, I'm using three different Faber-Castell Polychromos colors - light purple pink (started with this), middle purple pink, and dark red.
I'm working on a sketch of a rose - once again from a photo. Best to work from life, I realize, but in terms of practicing shading/colored pencil work the photos are useful tools for me (especially with toddler interruptions!)
The graphite rendering below is rough, but I want to use it as a starting point to refine the shading and eventually render in possibly pen/ink and colored pencil. The color of the rose is a beautiful, bright pink, with darker red buds, so I am testing out my pencils on the side to see what will work. 
 I finally had a chance to do a sketch of this beautiful little seashell I got at the beach a few years ago. It has dark green and gold/brown markings and a lovely spiral shape. I did a thin outline in pen and ink and then used colored pencil for the shell markings.
This is a drawing of two sea lions that I did last year. We saw these sunning themselves on the rocks in Monterey, CA several years ago. I loved the poses - they looked so regal as they tilt their heads up to the sun! The smell on the jetty where there were probably a hundred of them sunning...not so much. :)
I have finally finished the portrait of the two cats. Whew! It was a long process, but I am very pleased with the result. The final image is about 8.5" high X 15" wide, so I had to scan each cat in separately and combine them in Photoshop to get them all in one image here.
I added some shading in blue underneath each cat to give them some grounding within the drawing. I chose blue because it contrasts nicely with the orange color of the cats, and in one of the photos I worked from, the cat was sitting on a blue blanket.
Comments are welcome!
The second cat is coming along. I've done additional layering, further defining the dark stripes, which help to give shape to the body. I've layered the orange on top of that so my next step will be to continue to fill in shade/form with some of the more muted colors to tone down the orange. Getting closer to the finish!
I am continuing my work on the cats portrait. I've tweaked the first cat enough that I think it is mostly finished. I've switched my focus to the second cat at the moment. Starting to fill in the markings and initial layers of color.
It's officially springtime! You wouldn't know it here in Michigan as it was only near 20 degrees this morning. But the sun was shining brightly all day long and that made up for it.
I did a quick sketch, with pen and ink and some colored pencil, of a tiny, yellow crocus from my front yard. We have a nice little patch of them next to the driveway. Lovely harbingers of spring!
I did a good bit of layering last night and was able to get the first cat's fur color toned down and deepened. I also added a darker gray around the white areas to bring those out and add some shading. I still have some tweaking to do, but I really like where this is so far.
For the second cat, I started with the beginning layer of color, so I'm looking forward to getting that to a more finished point. In the end, I will need to add some color underneath both cats so they don't look like they are floating on air. :)
Slowly, but surely, I am making progress on the cat portrait. I've done a lot of work on the first cat and it is coming together well, I think. I will have to tone down the orange a bit, but that can be accomplished with additional layering of a medium ochre. Then, I'll get to do it all over again with cat #2! :)
The colored pencil is progressing. I'm starting to fill in the fur and markings. I will continue to do the layering, using 4-5 different colors to reflect the shading in the fur. This will hopefully give some depth and form to each cat, making them look more lively on the page.
I haven't posted an update on my colored pencil cats portrait for awhile...I had made good progress, but then realized some of the proportions were off and I messed up the markings on the face. Big no-no if I want the owner of the cats to enjoy the artwork!
So, I decided to redraw the base drawing, fixing my proportions and markings. Lesson for all - one I have learned before, but apparently forgotten - make sure your original, base drawing is 100% correct before you begin with color or paint! If it isn't, it will never look quite right, no matter how nicely you render your colored pencil strokes or watercolor washes.
I finally came up with a base drawing that I feel is accurate (as compared to the photos, which is what I am working from...) What you see below is where I have begun to replace my base, graphite drawing with colored pencil (using light gray to mark in the outlines of various areas.) I did render the eyes first and was happy with the way that turned out, so I proceeded with the fur, beginning to add color to the first colored pencil layer.
Stay tuned for further updates! P.S. My scanner isn't large enough to capture the whole drawing in one scan, so I will just post pieces of it for now to demonstrate my progress.
I was digging through some old sketchbooks and found a couple of travel sketches that I thought would be fun to post. Nothing fancy, but they definitely take me back to exactly when and where I drew them. It's something I would like to do more of - keeping a sketch journal either when I travel or just here at home.
This first one is from a trip to France that we took - we were in the city of Caen for a few days and I could see, from our hotel room, this beautiful window on the building next door. 
The one below is a view from Fisherman's Wharf in Monterey, California. I tagged along with my husband who was attending a conference there, so I had some leisurely time to just sit and draw, people watch, etc. It was even more fun when people would stop by to chat and see what I was doing! Great way to pass some time.
 Here is a little sketch I did this morning. It was a very rainy day, and I rather liked the big tree outside, with bare branches intertwining at all angles. Sort of reminded me of the noodle doodles I used to do in school in the margins of my notebooks. I only sat there for about 15 or 20 minutes, but it was a fun, meditative exercise to just start looking closely at the branches, seeing where a section went, what shape it took, etc. I hope to do more quick sketches like this one, just observing the nature around me.
In the spirit of anticipating spring, I wanted to post this sketch I did last April. I can't wait for my tulips and daffodils out front to start blooming this year. I hope to do a lot more sketches like this to capture the variety of shapes and colors that we have in our little flower bed.
For this drawing, I especially like trying to render the papery, brownish-gray membrane that covers the bud. The colored pencil on the stem seems a bit dull to me, but I think it was a combination of the paper I used and layering it on top of graphite. I think I'd like to play around with pen and ink and colored pencil like I did with the seed pods I posted a few months ago. 
Another step in the process for you to see. It is still coming along, but I am not sure if I kept the head markings correct as compared to the photo. I will continue this, but may end up redoing it in the end. Even if that ends up happening, this will be great practice for any future renderings.
I have continued to layer color and work on the fur for the first of the two cats. Still a long way to go, but it is progressing well, I think.
It's always interesting to see a drawing take shape before your eyes. And for something like this, that takes a bit of time to work on, it is really helpful to set it aside overnight, or for a couple of days, and look at it with fresh eyes. You might be surprised at your reaction. In fact, last night as I worked on this, I thought - oh no, this really isn't working...but then I looked this morning and it looked much better to me! I think it still has potential and I can see the layering coming together. Like I mentioned, it has a ways to go yet, but is starting to shape up.
This is the start of the colored pencil work on this piece. It's definitely a learning process for myself and I hesitate to even post this because it has such a long way to go! But I think it is really helpful for others to see how a piece like this looks from early on. It will take much more layering, with additional colors to match the fur, before it really starts to look right. So, you will get to learn as I do!As you can see, I am starting with just getting the fur pattern blocked in, along with the beginnings of shading, making sure I put my pencil strokes in the correct direction to follow the fur. This is very important to making a pet portrait look accurate. The fur contour gives form and shape to the animal's body underneath.


I'm currently working on a pet portrait of two cats. I've only come as far as a preliminary sketch of each individual cat. I eventually will combine them into one composite illustration that I hope to render in colored pencil. These cats have lovely orange and white markings and I think they would be best represented in colored pencil.
After waiting a few days, I decided to do some additional tweaking to this house portrait - just added a bit of shading. Here is the final version.

I have finished the inking for the house portrait (I think). I still feel like there might be some tweaking to do, so I am going to just let it sit for a day or two and look at it with fresh eyes to make sure there is nothing left to finish. I want to be cautious and not get too carried away with additional shading, but at the same time, sometimes one or two small changes can really improve the look. So, we shall see! The final image is approximately 9.5" X 7.5" and should fit nicely into an 11 X 14 mat.

This is an intermediate snapshot of the pen and ink process for my current house portrait project. Now that some of the landscaping has been inked (trees, shrubs, some grass) and more of the house is finished, it's coming together nicely. Additional shading and finishing the landscaping will complete the portrait soon.

I've begun the pen and ink work with this house portrait. It looks rather skeletal right now, but it will slowly fill in and really start to pop once the shading is added. Stay tuned!

I am finishing up with the pencil draft on my current house portrait. As you can see, many additional details as well as shading suggestions are included. I'll begin inking soon.
This is a pencil portrait I did of my great-grandmother. The photo I worked from had her face in shadow, so I rendered it that same way. If I did it over, I might lighten the shading on her face as it may be a bit too heavy. I don't often do portraits of people, but her kind eyes and well-lived wrinkles just made me want to give it try.

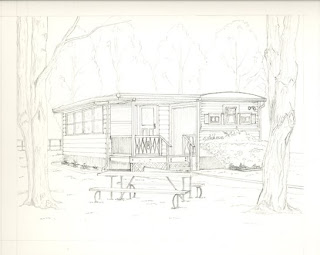
This is a house portrait that I am working on. This is a very early pencil draft. I still have much work to do on it before I go near it with ink, but it is starting to shape up nicely. It's a bit hard to see, but you can get an idea of the perspective and layout. Stay tuned for more progress!


